Showing posts with label equestrian woodworking. Show all posts

February 21, 2017

Tack Locker Update

The first warm Saturday after winter - you know, when you actually feel like spending time at the barn instead of getting back to your warm car as soon as possible - always contains predictable activities for me.

I:
- Organize my really heavy blankets, hoping I don't need them again.

- Pull my horse's mane that hasn't been done since...it was last above 50 degrees...which...at this point...is an embarrassingly long time ago.

So much better than a few days ago, when he was still looking positively uncared for.  Haha.

- Clean out my tack locker!  And this time, it got a full on reorganization, plus a new light, and a handy dandy wireless light switch (white box on the right).


For comparison, this is what it's looked like pretty much since I finished it and started using it a couple years ago:


The original intention for the built-out door was to hang saddle pads where my CWD kit and helmet are in the photo above, but it's just a tad too small for pads, so I've re-used those nails as shown here for two years.  But that was before I bought this during Riding Warehouse's President's Day sale:

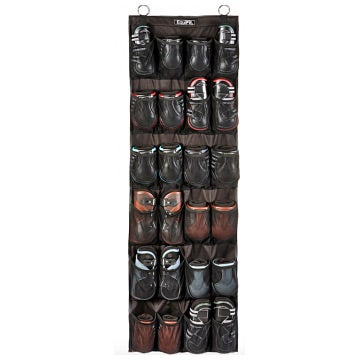
Equifit Hanging Horse Boot Storage Organizer - 24 pockets

It won't be here til later this week (so sad, I'm READY!), but it's the perfect size to fit inside that door, so I preemptively took down the extra nails, took out the shelf that normally holds boots/polos, and generally made a much better use of available space, knowing Connor's boot/polo collection (and probably some other items as well) will soon have a permanent home.

May 21, 2015

Tack Locker Followup

I've now had the tack locker in use since October, and thought I'd do a follow up on how it's been working out.

In short, pretty great:


I've made just a few changes from the way I thought I'd use it.  Saddle pads ended up not fitting well in the door, so I am using it for my Connor binder, tack cleaning kit, and helmet.  One clean Dressage pad and one clean AP pad are now folded neatly on top, while sweaty ones are with the rest of the barn's pads, drying in the sun on the pipe gate.

My other departure is hanging bonnets on the corkboard, which I thought I'd use for pictures and notes.  But the pushpins work really well with the (amazing) bonnets (that JenJ made for us):


I keep two types of things in here:  what I use on a daily basis for riding, and first aid.  Everything I don't need very often, like my little plastic show trunk, shipping boots and blankets, are kept in the loft upstairs.  Spare clean pads are kept at home.  It's not big, but that means I don't end up with extra stuff in there that I don't really need.

Finally, I am very glad I left the "refrigerator handle" on it, because I've started a habit of going straight to the locker and hanging my keys on that handle when I get to the barn, and haven't lost my keys since!  It's also really nice to have something to grab when my hands are full or when I'm wearing bulky gloves in the winter.  No regrets.


But as far as the locker vs. trunk debate goes?  I'm never going back to a trunk!  I can find things so much faster now.  If you ever have to make this decision, or have the option to build one yourself, go with a locker!

December 5, 2014

Tack Locker: Complete!

I am so excited to get to write this post, uh, mumbles 18 months...after starting this project.

How do people live without hatchbacks?

My tack locker went to the barn yesterday!

And if it was 2" longer, I would have had to rent a truck to get it there.

To recap, the tack locker began life in 1962 as a set of kitchen cabinets:


Which we removed in 2011 right after buying the house, because my 6'4 husband had to chop vegetables like this:


This project was an inexpensive way to keep my intense, probably creepy love affair with my miter saw and table saw going while Nick was unemployed.  (Part of the reason it took so long was that I didn't always have money for materials, even with it costing so little.)

I mean, saws are great.  Is there anything more thrilling than using a thing that could kill you to cut apart dead trees (besides riding a thing that could kill you over dead trees, of course)?

Using a thing that could kill you to cut apart dead trees.

Riding a thing that could kill you over dead trees.


I'm so happy with how it came out.  Functionally, it's so much better than a trunk, which matters most of all in winter when the last thing you want to do is waste time digging for things you know are in there, somewhere.  Most importantly, my trainer is impressed with it and loves having it in the barn (phew).  I guess anything is an improvement over my old blue plastic trunk that got chewed on by a foster dog, aesthetically.  I'm keeping it around for blanket storage, up in the loft.


Takeaways?  I learned a lot.  Like aspen is the WORST wood ever for cabinetry.  It's FUZZY!  That's why it was so cheap, and why I could afford it, though.  Also, building stuff is time consuming. This is a fun hobby for me, but it's not for everyone.

There are pegboard hooks through his hind XC boots to keep them on the shelf.

There are things I would do differently and things that are less than professional quality, but hey, it was made with 60% recycled (read: not straight!) wood during a period of extreme financial hardship, and it's my first try at real furniture.  It could have been worse!

In the upper left is a pull out drawer that holds about a measured cup of treats.  Below that is a basket of medical things, and to the right of that is a rack that will hold up to 6 whips.

Handle dilemma update: I decided to leave the front handle and I'm glad I did.  There's nothing better than having a nice big handle to grab with your gigantic winter gloves.  It also doesn't look as much like a fridge after the trim got put on.  I am also adding the side handles this weekend - didn't want to put them on til it was in place at the barn.

Cost breakdown:
Cabinet carcass: Free, unless you count my mortgage...
Furring strips: Free
Door frame: Free (formerly my husband's closet shelf)
Pegboard: $13
Washers and screws: $5
Aspen: $15
Blue paint: $8
Polycrylic: $2
Latch: $2
Hinges and wheels: free w/Amazon rewards points
Main handle: $5
Side handles: $6 w/Amazon rewards points
Trim: $15
Monogram (from Relatively Stable): $15
Pegboard hooks, basket, shelf brackets, and treat holder (that's the tiny blue drawer): $24

Total cost: $110

Tack Locker Adventure: Part 1, Part 2, Part 3, Part 4

November 18, 2014

Vote: Tack Locker Details

Time for a vote!  My 75% recycled materials tack locker is almost finished, and I am obsessing over the details.  (Part 1)  (Part 2)  Please note that in the below picture you have to use your imagination a little: the single piece of white wood trim at the top of the door will go all the way around the door, and the monogram is just taped up for demonstration purposes- it has a clear background, not a light blue background.


Does the handle make my tack locker look like:

A) A refrigerator (Thanks, husband)
B) A gun safe (Thanks, SprinklerBandits)
C) A classy tack locker that my trainer should be proud to have in the barn, hopefully, maybe...
D) Write-in vote

Should I:
A) Keep the handle
B) Get rid of it and do a small fingerhole handle on the right side of the door
C) Get rid of it and not have any handle

Not pictured are two stainless steel towel bars that I purchased to go on either side as handles to help in rolling it around (not that it will go anywhere once it's placed) + wet XC boot drying racks.  Do you think that is:
A) Really cool, do it!
B) Really cool, but that would look weird, don't do it.
C) Not worth it, you can just hang your wet boots on the pipe gate 20 feet away.

Thoughts?

August 17, 2014

Tack Locker Project Update, and Opinions Needed!

I've been working on this project for so long, some of you might not even have been reading this blog last year when I started it.  I had an old set of kitchen cabinets that we took out of my kitchen. and Connor's Aunt Mary inspired me to turn them into a vertical tack locker.  This is the original cabinet:


When you last saw it, it looked like this:


It was primed, had a door frame but no face, and temporary MDF sides while I figured out how to make my recycled kitchen cabinet carcass look good.  Today, it looks like this:


I worked on it as I got a little money here and there through the winter.  Because I am using about 75% recycled materials (read: wood I took out of my house), I ran into some problems that I wouldn't have if I started with new wood.

Problem: There are like six different types of wood of varying qualities in this thing.

Solution: Paint it.  This is the solution to more than one problem!

Problem: I built the door intending for saddle pads to hang on dowel rods horizontally, but 1) the kitchen cabinet carcass was just slightly too narrow, and 2) I hadn't yet figured out a way to hang the little dowel rods in a way I was happy with.

Solution: Drive nails (or maybe hooks, later on) into the center door support and hang them vertically by the billet straps.

I only usually keep "active" pads in my trunk now anyway.  I'm going to add strings that go across them to keep them in place, too, like the bandage lid of a normal tack trunk.
Problem: The door isn't quite square, because I framed it with a ripped down closet shelf original to my 1963 house, so the board wasn't quite straight anymore.  It doesn't affect the door's swing or latching, but it was pretty obvious due to the way I painted it:

Bright white stripe indicates slightly not-square door.

Solution:  Paint the face of the cabinet carcass (yes, that's really what they're called!) navy instead of white.  Paint and caulk hide a LOT of sins.

Problem: The size of the kitchen cabinet's carcass made my intended magnetic latch not quite meet up when I put the metal pieces on the door itself.

Solution: Scrap wood.  Some days it feels like this entire cabinet is being held together with scrap wood.


Problem, sort of: I intentionally put my door facing on the outside of the frame, because it seemed like the best solution for my built-out door intended to hold saddle pads.  This led to some less than attractive seams, which I knew going in:

Solution: Aluminum trim.

It's just taped on here to show what it will look like when finished.


The aluminum trim creates a new problem: how do you cut, and also do classy looking, ideally mitered corners, with metal trim?

Solution, maybe:  

I have a package of trunk corners on order from a woodworking company.  We'll see how that looks.

I have also done some general pimping-out of said tack trunk, including handles-that-are-actually-towel-racks-that-double-as-wet-horse-boot-drying-racks:


And casters that are more to get it off the ground than to move it.  It won't leave the barn once it's there:

This was an earlier picture, and a first coat of paint.

And cork, for the flat side (the other side has a big lip, which is why it's covered in pegboard.  Couldn't do that on this side):


And finally, this means I'm really close: pegboard organizers.

Shelf, treat box, whip holder (it holds six whips), basket with additional pegboard hooks of varying  types.

Now I need your help!  If I were to get a monogram to cover up this big blemish in the wood on the front of the door, perhaps from Personally Preppy, which style, size, color and finish should I get it in?  I know some of you PP fans are going to be all over this!

Almost there...

Options located here.

September 25, 2013

Tack Locker Project: Part 1

You three were correct from my previous post, I am building a tack locker!


When we bought this house (built in 1963), it came with some very inconvenient cabinets:


I call them inconvenient because this is a not-to-scale representation of what my 6'4 husband looked like chopping vegetables on that countertop before we removed the upper cabinets:

Forehead, meet inconvenient cabinets.

After removing said cabinets and my amazing husband giving me a surprise birthday present of a dishwasher and lights in that area in 2012, it now looks like this (the unpainted section has since been painted and the dishwasher is now boxed in):

Big improvement!

Anyway, that cabinet that was so inconvenient before is now finding a new life as a tack locker, and here's how I've done it so far:

Step 1:  Remove crosspieces with a hand saw.


It's actually supposed to be used to remove pieces of door casing above floors or something, but don't tell it that.  It did fine.

Ta da, empty box!

Step 2: Wood fill holes, sand, vacuum, wipe, repeat the last three often

Step 3: Cut 1" x 2" furring strips on which the pegboard can rest (I had the strips left over from a project I did in 2012, so $0!)

Step 4: Prime with leftover oil-based waterproofing primer ($0!)
Step 5, not shown: Use bad-ass table saw to cut down pegboard ($13).  Realize tiny adjustments are not as easy to make on the table saw as they are on the miter saw.  Learn how to take off the blade guard and use the push stick on the table saw to preserve fingers.

Step 6: Paint pegboard using a light grey sample quart left over from painting the living room in 2012. ($0!)

Step 7: Mount pegboard using screws, and giant washers for future stability ($5)

Step 8: Use bad-ass table saw to rip down a board I took out of my husband's closet when I redid it last winter, and turn said moderately straight board into moderately square door. ($0)
That is where I am right now.  The door is 3" deep, and will accommodate dowel rods inside it on which to hang (dry) saddle pads.  The primed side-wall you can see here will be covered in cork, while the facing side is more pegboard.  I've used Amazon points to pay for heavy-duty gate hinges ($0) and locking casters ($0) more to get it off the ground at the barn than to move it (it's not heavy, and I won't be taking it to shows, but it will still move occasionally).  I realize it looks giant here, but it's shorter than I am, and I am 5 feet tall.

Still to come: covering the outsides and door with aspen siding ($24), hanging the door, adding a handle ($?), buying pegboard accessories, adding casters, buying/mounting cork ($15), waterproofing the bottom ($?), adding ventilation ($?), adding external towel racks for drying wet pony boots/use as handles ($?) and finally painting and adding corner trim and other fancy things.  My goal is to keep it under $75, and I'm only able to throw money at it every so often, so it might be a while before it's finished.

What features would you look for if you were building a tack locker?

September 22, 2013

Work in Progress

I may not have ridden this weekend, since Connor has a swollen bite mark on his back right where the saddle goes today, but that doesn't mean I'm not working on a horsey project, one that so far has cost me a total of $15.  Thanks, scrap wood!  Can you guess what this is becoming?

Work in progress...